Navigation Bar

Monday 24 November 2014

PowerView - Getting Started


In this post I am going to show you how you can use PowerView using basic data model. In next post I will demonstrate how you can use PowerView to visualise data from SQL Server, Analysis Service or other data sources.

Assume we have following data in excel called “CountryNStates” as shown below image:


Now add these tables into Data Model using option available from ribbon as shown below image:


Once all your tables are added to data model, you can design a Data Model with proper relationship. Below is shown for above two tables:


Now it’s time to create some PowerView report.

To add a PowerView report in Excel, go to “Insert” tab and click on PowerView icon. You will see a new sheet for PowerView report. You should also see all the tables you created in the data model.

Here is the snapshot of the report:


Without doing too much, PowerView provides, filters, auto measures (i.e. SUM) etc. In above report the numbers are not formatted so I will show you how to format numbers etc.

Go back to Data Model design page by clicking on Manage button under “POWERPIVOT” tab and use formatting tab as shown below image:


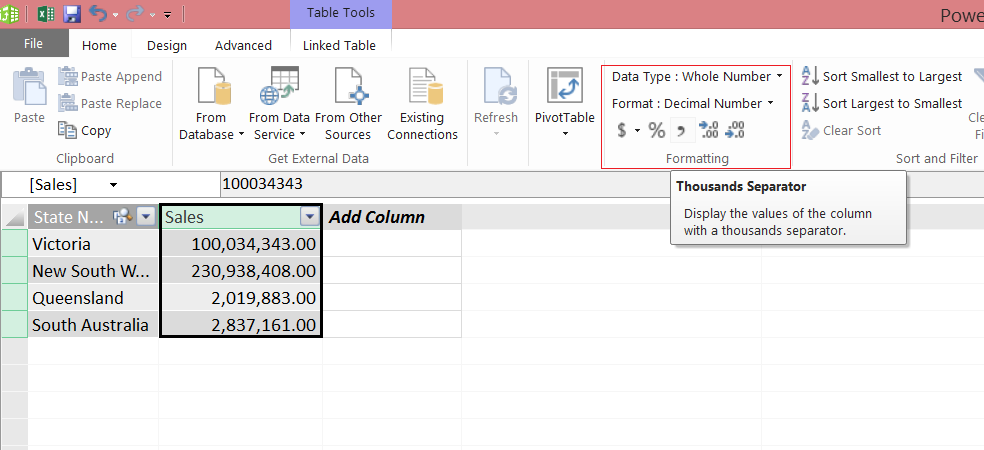
When you update it, Excel will prompt you in the report section that you have updated you Data Model. Now refresh the report you will see the numbers are formatted.


Now let’s add a measure that will show the percentage contribution to sales. I will call it “% Sale”. Here we will be using DAX (Data Analysis eXpression) to achieve this.

To create a measure, you need to go back to Data Modeling page. The formula for percentage would be like below:

% Sale of Queensland = ( Total Sales for Queensland / Total Sales in Australia ) * 100

Now let’s calculate it.

Below are measures in DAX:

Total Sales:=CALCULATE(SUM(Sales[Sales]), ALL(Sales))

% of Sales:=SUM(Sales[Sales]) / Sales[Total Sales]

Just make sure you need to display it like percentage. You can do this by right clicking on the measure and selecting formatting option then select “Percentage” option.

Once you have done this, you should see following measures in Sales table under measures area as shown below:


The beauty of % Sale measure is that it knows the context so we don’t need to say calculate % sale for Queensland etc.

Now add above % sales in the report. Here is the final report after adding % sales.


Please leave your comments if you like or dislike it. In next post I will show you how you can create BI Semantic Model using Visual Studio and deploy it to Analysis Service – TABULAR and consume it from PowerView in SharePoint environment.

That’s it for now. Happy SharePointing and PowerViewing J

Sunday 3 August 2014

Reading Settings from a SharePoint List in Nintex Workflow


Recently one of my client asked me to create a notification email service to send email for content refresh after certain period (x number of days). But I was not allowed to write any server side otherwise I could have written SharePoint Service.

As I was not allowed to write server side code, so I thought to create a Nintex workflow as they are using it in their environment. If anyone has got any other technique for this task please comment it.

Here is my setting list:


and Edit form


Note: I am using KeyName as a choice so that user cannot modify it by mistake.

And below is a snapshot of my test workflow that only logs the setting value:


When you configure Querying Workflow Settings list, from there you can create a workflow variable that will hold the setting value. For each setting value, you need a workflow variable.

Here is the snapshot of Workflow Variables popup:


And below is the screenshot of the configuration of Query List Action:


In Filter area, you need to specify the exact match so that Query List Action can fetch the values for that setting.

For instance, I have got a key name in the list as “FrequencyInDays” as you can see in the screenshot of the settings list.

Once you have filtered the key, you need to select the field, which has got the value for that setting and click “Add” button. After clicking on add button, that field name (i.e. KeyValue) will appear at the bottom as I have highlighted in red and then you have to select the workflow variable to hold the value from that variable.

By using this technique, you can read all required settings value from the list once a workflow has initialised or can be queried before using it in other workflow actions.

That’s it.

Monday 12 May 2014

Customising SharePoint 2013 People Search Result


Customising SharePoint 2013 People Search Result

1.       Copy an existing Display Template for People residing at Master page and page layouts gallery under Display Templates\Search\Item_People.html

2.       Name it whatever you want. For instance Item_KI_People.html

3.       To check the exact name of the field you are adding to ManagedPropertyMapping, go to your Search Service Application and click on Search Schema and view the property name of your desired property as shown below:


4.       Edit Item_KI_People.html file in your notepad and add following highlighted/boxed text:


5.       Upload as Item_KI_People.html and provide value for the metadata as shown below image:


6.       Navigate to Site Settings > Result Types

7.       Click on existing Person result type and select Copy

8.       Provide values as shown in image:


9.       Click Save.

10.   Now go to http://kispapp-dev:8080/Search/Pages/peopleresults.aspx?k=masood and replace kispapp-dev:8080 with your site hosting search center.

11.   Edit peopleresults.aspx page

12.   Edit People Search Core Results web part and select your desired Item Display Template shown in below image:


13.   Click OK and perform search and you would see new changes as shown below:


14.   That’s it. Enjoy and comment if it helped you save your time.

Wednesday 5 March 2014

Managing Permissions of Service Applications through PowerShell

Recently I was configuring PerformancePoint for a client. I did it through Central Admin but I wanted it to script so that their administrator can easily create in other environment.

There a lot of posts available about how to create Service Application and add administrators through PowerShell but could not find any post that describe add users to “Permissions” section of Service Application. I have highlighted the section in below image.


In this post I will share some PowerShell script that I used to assign permissions for Service Application (i.e. PerformancePoint Service Application) but can be used for other type of Service App.

#Define couple of variables
$ServiceAppName = "PerformancePoint Service Application"
$ServiceAppAdminAccount = "domain\youradmin"
$ServiceAppPoolAccount = "domain\yourapppool"

#Getting Service Application instance
$ServiceApp = Get-SPServiceApplication | where{$_.Name -eq $ServiceAppName }

Write-Host "Adding Administrators..." -ForegroundColor Yellow

$principal = New-SPClaimsPrincipal $ServiceAppAdminAccount -IdentityType WindowsSamAccountName

$security = Get-SPServiceApplicationSecurity $ServiceApp –Admin
Grant-SPObjectSecurity $security $principal "Full Control"

Set-SPServiceApplicationSecurity -Identity $ServiceApp.Id -ObjectSecurity $security –Admin

Write-Host "Users '$ServiceAppAdminAccount' have been addd to 'Administrators' group of Service App" -ForegroundColor Green

Write-Host "Adding Service Account to Permissions group of Service App..." -ForegroundColor Yellow

$principal = New-SPClaimsPrincipal $ServiceAppPoolAccount -IdentityType WindowsSamAccountName

$security = Get-SPServiceApplicationSecurity $ServiceApp
Grant-SPObjectSecurity $security $principal "Full Control"

Set-SPServiceApplicationSecurity -Identity $ServiceApp.Id -ObjectSecurity $security

Write-Host "Users '$ServiceAppPoolAccount' have been addd to 'Permissions' group of Service App" -ForegroundColor Green

That's it.

Thursday 20 February 2014

Got my SharePoint 2013 App called "Sliding Boxes" published


Today I got another app for SharePoint 2013 called “Sliding Boxes” published to Office store. It is a puzzle game and built using HTML 5 Canvas, jQuery and KnockoutJs framework.


Download it, play and enjoy J

Stay connected I will blog and share some code snippet  with you.

Monday 10 February 2014

Error in the Microsoft Server People Protocol Handler

Recently I was configuring People search and I was having some issue with crawling. I spent lot of time for searching and recreating the UPA but was not able to crawl.

If you have configured Synchronization connection and able to synchronised people from Active Directory to your SharePoint environment but you are getting “Error in the Microsoft Server People Protocol Handler” then this blog may help to fix the issue.

The first thing you need to make sure that the default content access account should have access to User Profile Service Application to fetch people data.

To check which account is configured for crawling, go to Search Service Application and check what is the account mentioned in “Default content access account” as shown below:


Next go to Service Applications and select “User Profile Application” and click “Administrators” and check your crawler (for demo: domain\crawler) should have access to “Retrieve People Data for Search Crawlers” as shown below:


Now start crawling (perform full crawl) and check whether you still getting same error. If yes then check another permission mentioned in next paragraph.

Next click on “Permissions” for selected User Profile Application and check whether your crawler have access to invoke service application.   


Now start crawling (perform full crawl) and check whether you still getting same error. If yes then check another permission mentioned in next paragraph.
The last check you should do is to verify your My Site Host web-app is associated with User Profile Service Application.
Go to Application Management > Configure service application associations

Check your My Site Host web-application proxy group and click the to make sure your User Profile Service Application is associated if not then add “User Profile Service Application” to that proxy group.

Now start crawling and you would not get that error.

Hope this post help you save time and fixed your issue. Let me know if you still having issue with crawling for people data.

Friday 31 January 2014

Feature is NOT visible in SharePoint 2013 - newly migrated from SharePoint 2010

One of the client they migrated their intranet from SharePoint 2010 to SharePoint 2013. So I develop couple of new features (SharePoint Feature) and deployed to new environment but it was not listing in Site Collection and Web level features sections.

So after doing some investigation what I found that the version of their portal was 14 (which SharePoint 2010 version).  So to make your Features available in Site Collection or Web level features list, you have to modify your SharePoint Product version as shown below:

Expand your package as shown in below image:


Double click on the Package.package item highlighted above and open properties window as shown below:


Change the version to 14.0 for SharePoint Product Version and deploy your solution and install feature using below PowerShell command:

Install-SPFeature <FeautreName> -CompatibilityLevel 14 –force

Where <FeatureName> should be replaced with Feature directory name or Feature Guid you have.

Hope that helps.