The report is accepting a parameter from query string to
load the data but by doing this, we were allowing anyone to see other’s data
that we don’t want. To make your report secure you have to add a field saying
“Created By” so that report can only show the currently logged-in user report.
I am creating a demo project for this purpose to show the
steps you can follow.
Create a project

Add a Shared Data Source and supply your database connection
information
Add a report item and write your query to show the data.
Now add “Parameter” called it “CurrentUser” as shown below


but as soon as I supply any other record id which is not associate/related to currently logged in user, it just shows blank report. That how I want my report to work.
Deploying
report to PRE-PROD/PRODUCTION environment
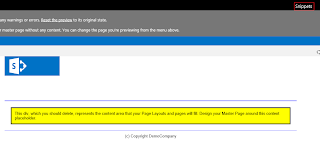
You will be shown a page, where you can associate Data Source for your reports, like below:

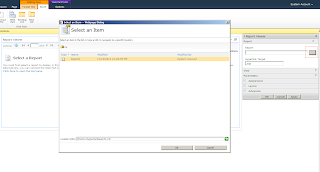
and select your report.


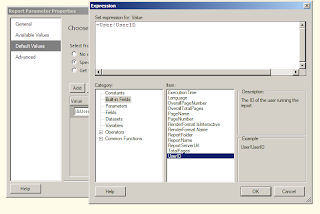
In the Default Values section, select “Specify values” and
then click “Add” button as shown below:

Click OK.
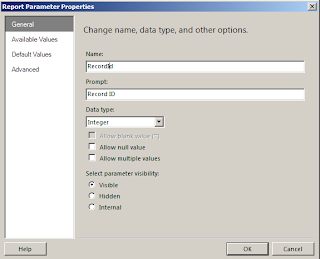
Add another parameter called “RecordId” to filter record.
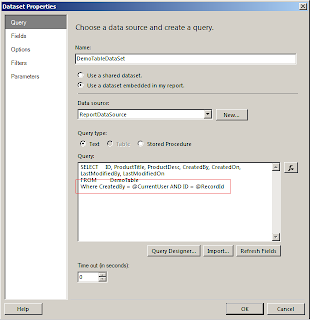
Now go back to your Dataset and edit it and update your query to include “CurrentUser” and “ReocrdId” parameter as shown below
Now supply 1 or whatever Id you have got in your database associated with currently logged in user to view data. Below is a sample screenshot:
Now go back to your Dataset and edit it and update your query to include “CurrentUser” and “ReocrdId” parameter as shown below
Now supply 1 or whatever Id you have got in your database associated with currently logged in user to view data. Below is a sample screenshot:
but as soon as I supply any other record id which is not associate/related to currently logged in user, it just shows blank report. That how I want my report to work.
To deploy a reports in SharePoint integrated environment,
you need to follow below steps:
Create a Report Library that will keep your reports and call
it “Reports” or whatever you want. Or if you have that library you can use it.
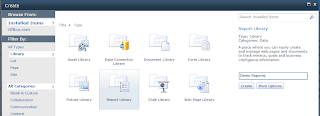
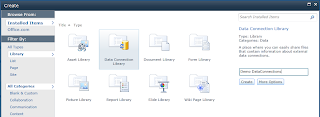
Create a data connection library that will keep your database connection for the reports and call it “Demo DataConnections”
Create a data connection library that will keep your database connection for the reports and call it “Demo DataConnections”
Create a .rsds file in your favourite notepad and name id
“Dem-DataConnection.rsds” or whatever you want to call it and write below
contents:
<?xml version="1.0" encoding="utf-8"?>
<DataSourceDefinition xmlns="http://schemas.microsoft.com/sqlserver/reporting/2006/03/reportdatasource">
<Extension>SQL</Extension>
<ConnectString></ConnectString>
<CredentialRetrieval>Integrated</CredentialRetrieval>
<Enabled>True</Enabled>
</DataSourceDefinition>
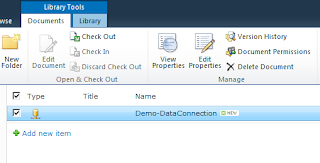
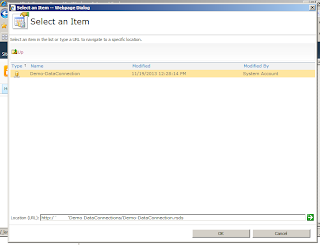
Create a data connection item in above created library (i.e. Demo DataConnections”) by uploading .rsds file and save it. Once it is uploaded, go back to your data connection library and click on link appears in the Name field as shown below:
<?xml version="1.0" encoding="utf-8"?>
<DataSourceDefinition xmlns="http://schemas.microsoft.com/sqlserver/reporting/2006/03/reportdatasource">
<Extension>SQL</Extension>
<ConnectString></ConnectString>
<CredentialRetrieval>Integrated</CredentialRetrieval>
<Enabled>True</Enabled>
</DataSourceDefinition>
Create a data connection item in above created library (i.e. Demo DataConnections”) by uploading .rsds file and save it. Once it is uploaded, go back to your data connection library and click on link appears in the Name field as shown below:
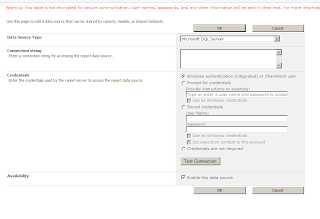
After clicking on “Demo-DataConnection” link shown in Name
field, you will be given another screen to supply connection to your desired
database:
Now upload your reports (.rdl files) in “Demo Reports”
library.
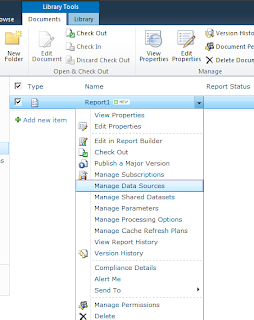
Now go back to your reports library and select your uploaded
report, expand ECB menu and then click on “Manage Data Sources” as shown below:
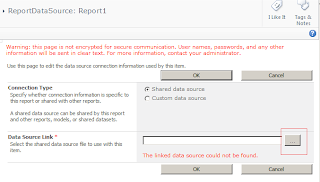
You will be shown a page, where you can associate Data Source for your reports, like below:
Click on “ReportDataSource” link and associate your data
connection to this report so that report can talk to database and fetch
records.
Click OK, OK and Close and you are done.
Now click on your report to view the data. So far the report is configured but it will not take any
parameter from query string to pass to your report.
Creating Report page
that accept values from Query string
To create a report page that can accept values from query
string and can pass to your report and can be linked with application please follow below steps:
Create a page in Pages library or Site Pages
Add SQL Server Reporting Services Report Viewer web-part and
click on “Edit web part Properties” as shown below:
and select your report.
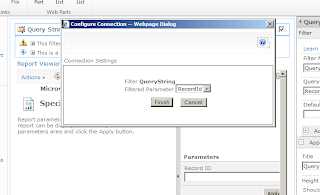
Now add “Query String (URL) Filter” web-part and give a
parameter name that you will be passing in URL. For instance http://www.mmasood.com/Pages/Report.aspx?ReportId=1
Connect Query String Filter web-part to SQL Reporting Service
Report web-part and bind the parameter to your report like shown below
Once it is connected, you can supply value in query string (i.e. http://www.mmasood.com/Pages/Report.aspx?ReportId=1 ) and that will be passed to your report.
I will try to package it in wsp and will upload it soon. That’s
all.