FxCop -- Framework Cop, checks code violations against some rule. You can write your own custom rule to enforce some rule in development area. For instance Checking Namespace naming convention or checking SPDisposeCheck etc.
In this post I am going to show how we can easily integrate FxCop with Visual Studio 2010 so that you can check violation while you build your project.
There are two ways to achieve this goal.
1. Adding FxCop as external tool
2. Adding Post build script
or you can run FxCop.exe UI tool to check violations in your assembly.
I am assuming that you have installed FxCop 1.36 and downloaded SharePoint.FxCop.BestPractices.dll rules from http://sovfxcoprules.codeplex.com/
Adding FxCop as External Tool in VS
1. Open visual studio and go to Tools > External Tools
2. Click Add button and specify following:
Title: FxCop 1.36
Command: C:\Program Files (x86)\Microsoft FxCop 1.36\FxCopCmd.exe
Arguments: /c /f:"$(TargetPath)" /r:"C:\Program Files (X86)\Microsoft FxCop 1.36\Rules" /gac
Initial directory: C:\Program Files (x86)\Microsoft FxCop 1.36
Do mark "Use Output window" as shown in below image:
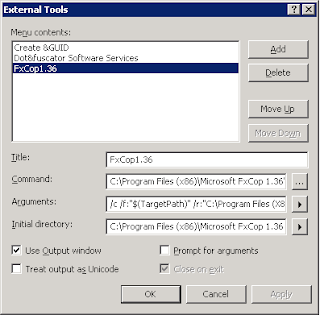
and click OK. You are done. :)
Build your project and call your new external tool you will see a similar output as shown in below:
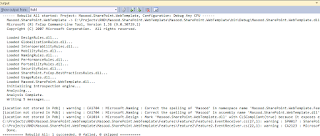
Adding post build script
1. Add following script to post build script section:
"C:\Program Files (x86)\Microsoft FxCop 1.36\FxCopCmd.exe" /c /file:"$(TargetPath)" /rule:"C:\Program Files (X86)\Microsoft FxCop 1.36\Rules" /gac
2.Add you desired rule assembly in "C:\Program Files (X86)\Microsoft FxCop 1.36\Rules" folder or you can specify your assembly folder via /rule:"Path to your folder"
3. If your assembly depends on other assembly which could be located at GAC or local file system, you can specify via /directory:"Path to your dependency assembly folder" or /searchgac or /gac
4. If you want to run FxCop in multiple .dlls you can specify multiple switch like /file:"Path to your .dll file" /file:"Path to another dll" or /file:"Path to a folder where mutliple dll resides"
Build your project and you can check all your violations in output window like below:
In next post I will be explaining how we can integrate FxCop with build pipeline.
Thursday, 27 October 2011
Wednesday, 13 July 2011
Showing search results in xml
Some time we need to cutomize search results via XSLT. To customize the search results, we need to display the results in xml.
Here is the xsl you can use in xsl property of search result core webpart to show the results in xml:
<?xml version="1.0" encoding="UTF-8"?>
<xsl:stylesheet version="1.0" xmlns:xsl="http://www.w3.org/1999/XSL/Transform">
<xsl:output method="xml" version="1.0" encoding="UTF-8" indent="yes"/>
<xsl:template match="/">
<xmp>
<xsl:copy-of select="*"/>
</xmp>
</xsl:template>
</xsl:stylesheet>
once you apply the property, you need to research to get the results in xml and write your XSL according to given xml to customize the search result page.
Enjoy customizing search results :)
Friday, 10 June 2011
Install SharePoint on 32-bit Hosts
Recently I found a vergy good article about installing SharePoint 2010 on 32-bit host machine.
I have not tried it, but I want to share wity you guys... if you guys have time do try it and share your experience here :)
http://www.topsharepoint.com/install-sharepoint-on-32-bit-hosts
http://comunidad.terra.es/blogs/moss/archive/2009/07/18/howtocreateasharepoint2010vmin32bitshostmachine2of5.aspx
That's good isn't it.
Enjoy...
Sunday, 5 June 2011
SharePoint Mini tool to generate Xml for Fields and Content Types
I have developed this mini tool to generate Fields and ContentTypes xml feature for quick development.
What you have to do is, just create you Site Columns and Content Types using SharePoint UI and then run this mini tool to get Features generated for you to use in WSPBuilder project or SharePoint 2010 projects.
Here is the UI:
Download from Codeplex
What you have to do is, just create you Site Columns and Content Types using SharePoint UI and then run this mini tool to get Features generated for you to use in WSPBuilder project or SharePoint 2010 projects.
Here is the UI:
Download from Codeplex
Friday, 3 June 2011
Creating Secure Store Application using PowerShell for SharePoint 2010
Secure Store Application is enhanced version of SSO (in SharePoint 2007), which is use to store important information that can be used in the application. The information could be a connection string or user name or password.
It stores securely so you don't need to worry about the encryption and decryption. There are APIs to read values from it.
Yesterday one of my friend had some issue with creating Secure Store Application using PowerShell.
If you create an Secure Store Application from Central Admin, you can follow below steps to get it done:
Log on to Central Admin
Click Manage Service Applications
Click Secure Store Servie
Click New
Supply all you details and click OK. To set your connection string, following step as shown in below image:
Now the Secure Store Application is ready for use. When you do automated testing for deployment you need some scripting to create all these for you.
I am going to show you how we can get the same thing done using PowerShell script and we can use that script for deployment or creating staging or dev environment for projects.
$connectionStringField = New-SPSecureStoreApplicationField –Name “ConnectionString” -Type Generic –Masked:$false
$fields = $connectionStringField
$userClaim = New-SPClaimsPrincipal –Identity “youdomain\administrator” –IdentityType WindowsSamAccountName
$demoTargetApp = New-SPSecureStoreTargetApplication –Name “DemoApplicationID2” –FriendlyName “Demo Target Application 2” –ApplicationType Group
$app = New-SPSecureStoreApplication –ServiceContext http://uwsp2010dev-1 –TargetApplication $demoTargetApp –Fields $fields –Administrator $userClaim -CredentialsOwnerGroup $userClaim
Things to note is that you must pass CredentialsOwnerGroup, when you look in MSDN it says it is optional but its NOT.
Tuesday, 24 May 2011
Provisioning Managed metadata field through Feature in SharePoint 2010
Managed metadata columns is very great feature introduced in SharePoint 2010 to manage in one central place.
Below I am going to illustrate how to use managed metadata field in feature.
To get it working, we need to create two features. 1) for field provision 2) for binding
We can't use binding through declarative way as we don't know what will be GUID for TermSet and TermGroup in new environment or where we are going to deploy. So that's why we need some event handler to find the Guid and associate it with field.
Following is a feature called "Fields Provisioner" to provision a field in declarative way:
when you activate the above feature it will create a Field in SiteColumns gallery but it would not bind to TermStore, so you can't use it.
Below is another feature for binding, let call it "Field Binder":
public override void FeatureActivated(SPFeatureReceiverProperties properties)
{
using (SPSite site = properties.Feature.Parent as SPSite)
{
//Field to be linked with TermSet
//Look at element.xml file for these GUID
string fieldGuid = "{930C252B-6CB9-4D37-992F-0B017D751FB3}";
TaxonomyField field = site.RootWeb.Fields[new Guid(fieldGuid)] as TaxonomyField;
TaxonomySession session = new TaxonomySession(site);
TermStore termStore = session.TermStores["Managed Metadata Service"];
int lcid = CultureInfo.CurrentCulture.LCID;
Group taxonomyGroup = termStore.Groups["Project Name"];
TermSet termSet = group.TermSets["Document Category"];
// Connect to Managed Metadata Store
field.SspId = termStore.Id;
field.TermSetId = termSet.Id;
field.TargetTemplate = string.Empty;
field.AnchorId = Guid.Empty;
field.TextField = new Guid(hiddenFieldGuid);
field.Update(true);
}
}
Once it is binded, you can use in any lists/document libraries or content types.
In above code I am using TaxonomyRepository, which contains few methods to get the GUID of TermSet, TermGroup and TermStore.
Following is the snapshot of project structure:
After activating the feature, you would see similar result shown below:
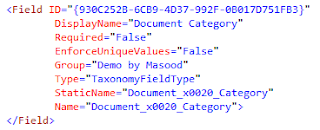
Updated: Included field xml as well.
Below I am going to illustrate how to use managed metadata field in feature.
To get it working, we need to create two features. 1) for field provision 2) for binding
We can't use binding through declarative way as we don't know what will be GUID for TermSet and TermGroup in new environment or where we are going to deploy. So that's why we need some event handler to find the Guid and associate it with field.
Following is a feature called "Fields Provisioner" to provision a field in declarative way:
Below is another feature for binding, let call it "Field Binder":
public override void FeatureActivated(SPFeatureReceiverProperties properties)
{
using (SPSite site = properties.Feature.Parent as SPSite)
{
//Field to be linked with TermSet
//Look at element.xml file for these GUID
string fieldGuid = "{930C252B-6CB9-4D37-992F-0B017D751FB3}";
TaxonomyField field = site.RootWeb.Fields[new Guid(fieldGuid)] as TaxonomyField;
TaxonomySession session = new TaxonomySession(site);
TermStore termStore = session.TermStores["Managed Metadata Service"];
int lcid = CultureInfo.CurrentCulture.LCID;
Group taxonomyGroup = termStore.Groups["Project Name"];
TermSet termSet = group.TermSets["Document Category"];
// Connect to Managed Metadata Store
field.SspId = termStore.Id;
field.TermSetId = termSet.Id;
field.TargetTemplate = string.Empty;
field.AnchorId = Guid.Empty;
field.TextField = new Guid(hiddenFieldGuid);
field.Update(true);
}
}
Once it is binded, you can use in any lists/document libraries or content types.
In above code I am using TaxonomyRepository, which contains few methods to get the GUID of TermSet, TermGroup and TermStore.
Following is the snapshot of project structure:
Updated: Included field xml as well.
Subscribe to:
Posts (Atom)